
Author of Be Ready for Anything and Bloom Where You’re Planted online course
Is your house like an unfortunate cross between Doomsday Preppers and Hoarders?
How do you store your preps? Are they neatly organized, where you can grab what you need at a moment’s notice? Are they a jumbled mess that makes your house look like an abandoned storage facility? Perhaps they are hidden chaos, tucked away neatly in drawers and closets, but with no rhyme or reason.
I like to consider myself pretty organized. After all, my house is tidy (at least when people come over). I keep my food preps in one area, my medical preps in another area, and home supply preps in yet another area.
It doesn’t matter how many preps you have if you can’t find what you need.
A turning point for me was when my daughter burned her hand making cookies one time, it took me more than half an hour to find the specific ointment I wanted to use to treat it. I used raw honey from the kitchen for immediate relief while I turned my medical supply closet upside down looking for it.
Fortunately, it wasn’t a bad burn, but what if it had been? What if it had been some kind of crisis that required immediate and swift intervention and the First Aid items needed had been mixed in with the bathroom supplies?
Here’s something else. How many of you have sought in vain for an ingredient that you know you have 77 and 1/3 boxes of, only to have to go to the store to purchase it because you can’t find any of those elusive boxes?
When you stock up the way a lot of us do, organization is vital. Otherwise, important supplies go missing. You spend valuable time searching for them and money replacing them, even though they’re lurking under your bed, taunting you from the shadows under there. Even worse, sometimes food expires while it’s tucked away, forgotten and unrotated into your kitchen, leaving you with pounds of edibles so stale that they can’t be consumed.
The biggest stockpile of supplies in the world won’t do you any good if you can’t find what you need when you need it.
Now is the perfect time to get organized.
Why wait? The longer you put it off, the worse the chaos will get.
I live in an older house without a lot of closets or pantries, so I have to be creative to stash all my stuff. This hodge-podge of storage spaces can lead to the disappearance of supplies or “Where-did-I-put-that?” Syndrome.
Resolve to no longer be a “Doomsday Hoarder”. Check out these 6 OCD hacks to help organize your supplies and bring order to the chaos.
Step #1: Make a Huge Mess
To reach a point of order, you have to, painfully, start with a huge mess. Expect this process to take 2-3 days, so don’t start at a time when you have lots of other stuff to do.
Your first step is to take everything out of every little hidey-hole around your house. All of it. Every single bit. Only then can you see what you have.
There are a lot of benefits to this. At the same time that you are organizing, you can also:
- Put like items together. Once you have everything out, begin to group like items together. Maybe your grains are on the kitchen table, with the buckets on the floor nearby. Maybe your stash of vitamins is on the kitchen counter. Whatever your supplies are, consider the things that go together.
- Make an updated inventory list. Do you have as many supplies as you thought you did? Do you have more supplies than you thought you did? Write everything down in a notebook. Don’t worry about how you jot things down – you’ll organize your inventory master list later.
- Clean out your storage areas. Now, while they’re empty, is a perfect time to clean out your storage areas. I like to clean areas that are going to store food with the most natural products possible. You can use vinegar and water, or a non-toxic cleaning product. I’m a big fan of the Method brand
 or Mrs. Meyer’s brand. (Mrs. Meyer’s is pricey but wonderful.) Scrub everything down and then leave it open to air out while you’re organizing your stuff.
Step #2: Contain Yourself
Once you have everything you own, grouped by category and covering every available surface in your kitchen, you’ll have a better idea of the types of containers that you need to keep things organized.
I like to use large containers filled with small containers. (Sort of like I did here in my vehicle kit.)
I also really like for my containers to match, but maybe that’s just me. I feel like it looks more organized that way. Certainly, don’t go spend a lot of money on matching containers if you already have containers.
Here are a few different types of organizational containers:
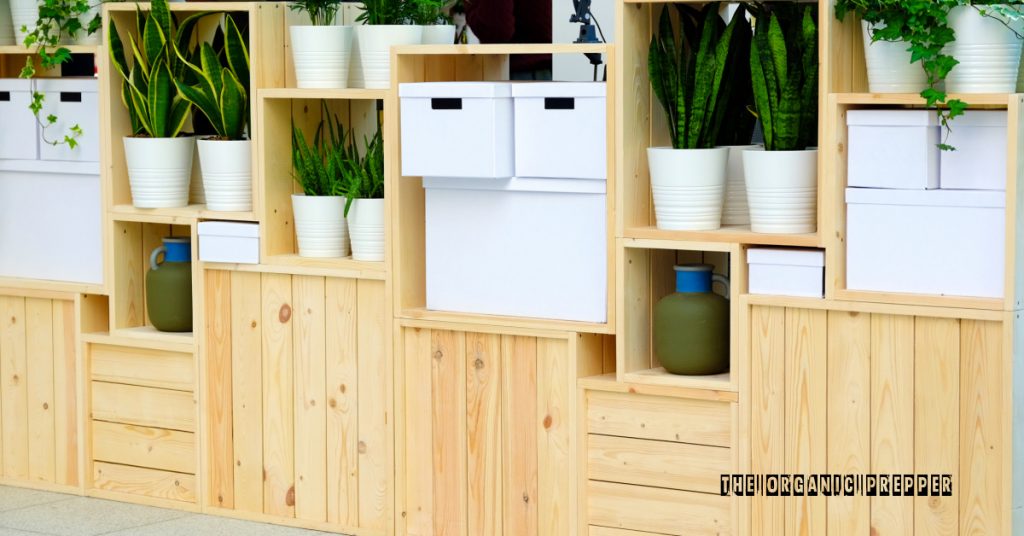
- Use different colors for different types of supplies. You might use green for gardening and seeds, blue for health and beauty, red for first aid, and yellow for food. If you can’t find containers in these colors, you can mark them with color-coded tape for labels.
- Use transparent containers for small items. If you get see-through containers for smaller items, you can see what’s in it at a glance instead of rifling through lots of closed boxes. (This 12 piece transparent set is easily stackable, making it perfect for the pantry.)
- Go with the same brand. It’s easy to consider getting a hodgepodge of containers by just grabbing a new one each time you need them. But if you go with the same brand, the uniformity means that you’ll be able to stack them more easily, both before and after they are filled. Amazon has 9-piece sets and 12 piece sets that you can purchase for a fairly reasonable price.
- Use things for your own purposes. Sometimes an item is designed specifically for a particular use but will work swimmingly for a different use. I have lingerie dividers on a small shelf in my pantry to corral small items like little packets of seasonings, dry soup mixes, cupcake liners, and decorative items for baking.
- Use baskets for items that are needed frequently. If you have some items that you use often, corral them in baskets for a tidy, uncluttered look. You can pick up baskets inexpensively at any thrift store. Simply spray paint them all the same color for a uniform look.
- Check out book boxes. I really love those heavy cardboard book boxes. They’re extremely sturdy and designed to stack perfectly. Since they’re cardboard, you can easily write on the outside with a Sharpie. You can get them at a great price on Amazon, or from your local U-haul store.
- Be creative. If budget constraints mean that buying new containers for your stockpile is not in the cards, be creative. Use the things you have on hand. Give cardboard boxes new life with a little bit of pain on the front. Cut them down to the size that works best for your home. Paper grocery bags, while they can’t be used to lug heavy supplies around, can be rolled down and used to contain small supplies that would otherwise be floating loosely around your shelves.
Step #3: Decide Where to Stash Your Stuff
Everything needs a home. If you organize this way, even if you can’t immediately lay hands on the item you’re looking for, you can at least have a place to start digging. Here are some ideas from my upcoming book, Prepper’s Pantry![]() :
:
Every room in the house is fair game. There’s no reason that food must only be stored in the kitchen. Keep similar items together, for the sake of organization. Think about the grocery store – it’s generally easy to find items because similar things are organized together. There is a condiment aisle, as cereal aisle, etc. You can apply this principle to your home storage also.
Beware of extremes in temperature, moisture, and rodents and other pests and store items in the past possible environment for their shelf longevity.
Here are some places you can store preps:
- Kitchen Pantry
- Kitchen shelves
- Broom Closet
- Storage furniture like armoires, benches, and beds with drawers
- Mudroom
- Basement
- Garage
- Attic
- Laundry room
- Laundry room shelf
- Bookcases (Ikea has some nice ones that you can customize with sliding doors)
- Coat closet
- Linen closet
- Bedroom closets
- Under beds
- Outbuildings like garden sheds or barns
- Spare room
- Under the sink in the bathroom
- Under a tablecloth (make an end table or coffee table from large storage tubs by topping them with a larger piece of wood, then covering with a decorative tablecloth)
- Dresser drawers – dressers can be tucked in nearly any room in the house and offer a wealth of organized storage space
It is important to maintain your OPSEC when stashing away your food. OPSEC is a term swiped from the military that means OPerational SECurity. It means that your operations, in this case, your one-year supply of food, should not be public knowledge. OPSEC is the process of protecting little pieces of data that could be grouped together to give the bigger picture. “OPSEC is the process of protecting little pieces of data that could be grouped together to give the bigger picture.”
In the event of a long term disaster, your neighborhood will be filled with hungry people. Even in a short term disaster, as we saw in the aftermath of Hurricane Sandy, some people are without food after only 2-3 days. You don’t want your home to be known as the one with all the food. During an event of civil unrest, you could become a target. Store your food and supplies in a way that they are not noticeable at a casual glance.
Step #4: Create a Map with Locations
The most important step comes before you actually put your supplies away. You have to create a master list to serve as a “treasure map” to your supplies. Three paces towards the setting sun, one baby step left, look up. That kind of thing. I can’t even tell you how much I love creating master lists like this.
Depending on how detailed you want to be, your “map” can be constantly updated with the amounts of items you are putting away and taking for use in the kitchen. If you plan to update like that, consider a dry-erase board![]() hung on the inside of the pantry door.
hung on the inside of the pantry door.
Lots of people love spreadsheets, and keeping your map on the computer is a great idea….unless the grid goes down. It’s important to have a hard copy for that reason. If you make a spreadsheet, be sure to print it out.
I’m more of a notebook person myself. I keep a spiral notebook like this one![]() , divided into sections, with my map.
, divided into sections, with my map.
One of the smallest places I lived was in our little cabin in the woods. Here is how I mapped out my supplies there:
- Kitchen Pantry: Items currently in rotation live in the kitchen pantry. When these items get low, I rotated in their replacements from the other location.
- Kitchen shelves: Home canned foods – these will be eaten within a year of preserving them, so I keep them handy.
- Mud room: I installed shelves to make it easier to find things. This room gets cold in the winter and hot in the summer, so I don’t store food here. Laundry supplies, cleaning supplies, dish soap. Candles, lighters, extra solar lights, matches, lamp oil, batteries. Tools, screws, nails and other small hardware.
- Blanket Storage area in guest room sofa: Beans. Bags and bags and bags of beans that have been sealed into Mylar bags and placed in a bench that has a lid that lifts for storage.
- Armoire in guest room: “Decorative” boxes (I glued attractive paper to the outside or cardboard boxes I got for free at the grocery store) are full of baking items like baking soda, baking powder, chocolate chips, etc.
- Laundry room closet: 5 gallon water jugs and buckets of bulk grains, floor to ceiling. I wrote on the front of the buckets with a Sharpie for ease in finding the grain I’m looking for.
- Laundry room shelf: Grocery store canned goods: vegetables, and beans only
- Living room bookcases: There is a curtain running in front of the bottom shelf. Behind the curtain are dozens of jugs of white vinegar, as well as balsamic vinegar, apple cider vinegar, and red wine vinegar.
- Front hall closet: Rubbermaid containers with pasta, rice, and quinoa.
- Linen closet : Grocery store canned meats (we never use these and they exist as a last resort), fruit, dry milk, and pie filling. Medicines, vitamins, and first aid supplies.
- Bedroom closets: The back wall is lined with boxed goods like cereal, crackers, etc. There is a cool bungee cord grid holding the boxes in place. Clothes hang in front of this stash.
- Under beds: under-bed containers filled with dry pet food sealed in mylar bags.
Step #5: Create Some Kits
I like to have kits that are ready for specific emergencies. I have these kits packed in large tubs, labeled, and stacked in my mudroom. Some kits you might want to create:
- First Aid Kit: Sure, you will have lots of miscellaneous supplies too numerous to stash inside a kit. But keep the basics in one place so that you can immediately provide attention in an emergency. I use a fishing tackle box for this.
- Pandemic Response Kit: When it looked as though Ebola was going to race across the country, I put together a large tub with pandemic supplies such as Tyvex suits, N100 masks, bleach, bleach wipes, etc.
- Power Outage Kit: This kit is made easy to access so I can find everything in the dark. Right on top is a headlamp so I can go through and access the supplies we need. This kit has candles, lighters, matches, flashlights, batteries, etc.
- Bug-out Kit: Of course, the ultimate kit for preppers is your bug out bag. See this article for instructions on putting together a near-perfect kit.
- Water Kit: I have a container earmarked for a water emergency. In it, I can find spare parts for my Berkey, water purification tablets, testing kits, etc.
- Irreplaceable Items: During the King Fire, when we thought we were going to have to evacuate, I packed a box full of special items that are irreplaceable: baby pictures, a couple of special books, some heirloom jewelry, and other sentimental items. If you have to bug out, there are some things that you’ll want to take with you. If those items are already packed up, you won’t have to spend valuable time looking for them.
Step #6: Finally…put everything away
Ahhhh….finally. You’ve gotten through all of the other steps and you get to put all those things away. (And maybe even be able to cook a meal since your kitchen will be clear again!
Some things to remember when putting away your supplies:
- Wipe things off as you go along. Keep a damp cloth handy while you’re putting things away – you don’t want to put away dusty, grimy supplies in your nice clean storage areas.
- Check your expiration dates. Put the items with the closest dates where they’ll be used before they become stale or spoiled.
- Label, label, label. Did I mention you should label? For the love of all things cute and fluffy, label your containers so that you don’t have to dig through each one to find out what is in it. You can use a Sharpie or get a really cool label-maker for this purpose. (This one has lots of different options.)
- Be sure to record everything on your map. You can include details like expiration dates, quantities, etc., to make your map a running inventory.
- Keep a separate list of things you’ll need soon. Are you lower on bandages than you thought you were? Maybe you only have a couple of tubes of antibiotic cream left. Make a list that you can keep with you while you watch for sales throughout the year.
There….isn’t that better? I know I always feel good when I can lay hands on my supplies immediately.
How do you stay organized?
Do you have any tips that help you keep your supplies organized? How often do you go through your stash and inventory it? Please share your advice in the comments below.


I’ve been fretting lately because we built can holders in one part of the basement while most other goods were stored in another area. I guess prepper sprawl in inevitable, eh? Right now I’m convinced I can put my hands on anything I need within seconds, which makes me think either I’m overconfident in my organization, or I don’t have enough stuff yet. Of course, when DO we ever have enough? Great stuff, Daisy. Happy New Year and such. 2015 ought to be interesting.
good article. I live alone in a small apartment so I am always open to any storage ideas. fortunately, I have a large pantry closet where I keep most of my food storage with water storage on the floor. I am going to put together some sort of work area in the bedroom because I just bought a large dehydrator. I cant wait to start using it next week. I have a good friend across the hall from me and we plan to put up food together. she had to give away all her preps 2 years ago when she moved and couldn’t afford to take everything. we are working together to rebuild them. I am to hunt for canning jars and mylar bags…wish me luck.
http://www.discountmylarbags.com is my goto source for mylar bags and oxygen absorbers. To seal the larger ones, I bought a $10 hair iron(?) at Walmart. Takes a little practice to not overheat the mylar, but works quite well. I’m also thinking of lining the iron with something like parchment paper the next time I have some bags to seal.
Great stuff, Daisy! It’s time for me to do a thorough review of my storage. Most is in the basement and I’m thinking it’s time to “distribute” stuff up AND downstairs. Thanks for the “plan”!
Another quick hack for minor burns is vegetable glycerin. If you have to have any on hand apply it to a fresh burn. It will take the sting out immediately and you’ll be well on your way to healing in 24 hrs.
Don’t scimp on shelving! I learned that hard lesson last year. Since I am always broke I bought “affordable” shelving units and bookcases from the hardware store and Walmart. Well that was a big mistake! Canned goods and bulk grains are HEAVY! The cheap shelving lasted about a year until the shelves started to sag and droop and bookcases started to come apart. So I was forced to pull everything and replace with heavy duty shelving units. Costco and some hardware stores have an awesome shelving unit that holds 1000 pounds PER shelf. That’s 5000 pounds per shelf unit and they are only around $65-69. So spending a bit more upfront will save money and lots of headaches down the road.
Great point! And can you imagine the mess if the unit holding your fully loaded canning jars collapsed? Yikes!
Your first point is true, and, unfortunately, a must. But I feel so much better after bunching my mess back into manageable kits and “known” locations! Great tips and article, Daisy!!
I have to say it because you won’t believe how well it works until you try it the first time. Lavender essential oil for burns. I keep a little bottle in the cabinet next to my stove. When you burn yourself, immediately apply the lavender eo liberally to the area and keep it on there. Do not dilute, wash, apply ice or run water over it. It won’t kill the pain but the next morning you won’t be able to tell you burned yourself, no blistering, swelling, redness.
All good ideas for organizing. Here’s the follow-up question: How to defend your careful plans from relatives?
In ALL three cases I know of, including mine, when a person living alone has a sudden unexpected hospital stay, the relatives have broken in (without any notice to the now-absent owner) under guise of “helping” and made a shambles of a lifetime’s worth of planning and accumulation. In one case, the out-of-state relatives decided the house needed heavy restoration, so they threw away a perfectly good fridge since they mistook gnats stuck on sticky stuff on the door seals for black mold. They ripped up and hauled away all carpet in the house except for under-bed sections. They hauled much of a lifetime’s accumulation of “stuff” away in PODS for storage, but threw away some unknown portions, and then had to return home, leaving the owner’s place in a shambles. The owner, still in temporary assisted living today during his recovery, doesn’t yet know how much was trashed and what is in storage.
In my case, relatives hired a locksmith to break in, paid a couple of my bills, threw away financial records and some financial and medical newsletters I spent serious money for, scattered my books all over the house so I didn’t know if they has been thrown away or stolen. Tools were moved to different rooms, taking me six months to find some of them again. Privacy shrubbery around the house was 90% destroyed. Firewood I was letting dry out was hauled off to landfill. Keys vanished. A Swiss army knife vanished. An ultra-light camping stove vanished. Containers I had been saving for repurpose (for many years) in large contractor sacks were trashed. I didn’t even get an apology or any indication of regret when I described the incredible mess to said relatives.
In all three cases, the relatives seemed to feel with zero remorse that they knew better than the owner how the owner’s homestead “should” be re-worked to THEIR standards — NOT the owner’s.
To this day, I haven’t figured out how a single individual during a surprise hospital stay can defend against such arrogance by relatives using the guise of “helping.”
–Lewis
Lewis, The best thing anyone can do is download a Power of Attorney for your state and have it appoint a trusted friend, neighbor or relative to look after your home if you are incapacitated. It MUST say that they are not to change, remove or repair anything in your home with the exception of taking out the trash or fixing leaks that might occur. Also have the document state that no one other than the executor is allowed in your home and that the police etc will be called to immediately remove anyone else.
This is very general. You need ask an attorney for specifics to safeguard your home and possessions.
Well, this was an excellent article on how to get & stay organized
-but-
nothing addressing that most ‘food(s)’ need to be kept at between 40 & 65 degrees to get the longest shelf-life out of it!
Antics and garages are (most times) to hot in Summer & to cold in Winter!
If storing in a house or apartment, how the heck do you keep freeze dried and other foods between 40f & 65f all year round?
That’s a big issue for a lot of folks who don’t have basements or a cold room. All you can do is keep it optimally in other ways, avoiding humidity, light, and pests. Yes, storing your food in a warmer room will cut the shelf life, but if you’re focusing on foods with a multi-year shelf life, I think it’s a reasonable compromise. It’s still important to rotate your food into the kitchen and use up home-preserved things first.
Having an aloe plant on hand is great for burns and doesn’t have to be hidden. I think Lewis had a great question and I’d like to see what others think. Also some people do snoop when they are house guests. Its hard to keep opsec if your supplies are in an armoire where you guests are sleeping or in a linen closet if they need something. Yeah, I know, put out everything they may need so they don’t have to look for anything but still…..
I have no idea’s really, when it comes to Lewis and his “helpful” relatives. If you have relatives, my only suggestion would be not to let them know you are in hospital. If hospital needs a relative’s name to contact if something drastic were to happen to you, then only give them one name, the relative you trust the most. And be sure to talk to that relative ahead of time and let them know your concerns about someone deciding to “take care of things” while you are laid up. Our son (one of them) is the only relative I trust, and he lives close by. I have drawn him a “treasure” map to all the locations in and around the house where we have stuff stashed. I am prepping for my husband and I, our son and his wife, (but don’t trust her to know everything), and possibly 3 grandchildren and possible spouses. However, since two of them are now committed to the military, don’t figure they will be coming here. And I don’t think the third could handle being way out here, so isolated from the big city. They are all young, just turning legal ages, so they don’t know enough yet to be scared of the future and what we all see as inevitable. They live for the moment. Oh, to be young and ignorant!! And invincible!! The bliss that must be!!
For power outage I use outdoor solar lamps. I keep them in a place I know where I can reach them and charge them on sunny days. Also in my bedroom in the bottom night table, I store glow lights for easy access.
You, Daisy, are a genius. Thank you for sharing a bit of your organizational talent!
Lol. I’m in the middle of sorting out canned goods being consolidated from several different old storage areas. Sorting by like items then by dates for first in first out. I’ve already begun the spiral notebook. Seems like were on a similar path here. I’m also roasting a turkey for today’s eating and canned soup to add to the supplies in glass jar. Figured it was a good time even if a bit hectic so I can make room for the jars as I go. Not today but another day soon I’ll be canning a ham. In pint jars it will still be plenty of meat for two great grandparents to use at any one time. Today’s bounty will be turkey vegetable soup. Nearly everything is ready. Once I get the jars in the pressure canner it back to sorting while the cooking time passes. Its a good job for a snowy few days when I’ll get outside as little as possible. This soup will be one of those meaty concoctions that leftovers can be added to or cook pasta or rice specifically to go with it. More than one meal for the two of us. When the kids were home I canned more in quart jars. Now far more in pints.
This is one area of prepping, I’ve been concerned about from Day 1 of starting the Prepper Journey. How to keep it all organized and readily accessible. For myself, I started with creating a space out of what’s generally unused or poorly designed use space. For us that was a small closet under the stairs to the basement. Tearing out the original contractor built closet, revealed a lot of wasted and unused space, so much so, that by the time I was finished, the usable space was 3X bigger than before, yet the actual space that was taken up did not exceed the original footprint of the closet, it used it more efficiently. It also allowed me to secure my gun closets as a second layer against unauthorized access. Installing a metal door, along with the use of metal lathe on the exterior and interior wallsbof the closet, before putting drywall back up, may not be impregnable, but it will require a heck of a lot of time and effort to defeat to gain access.
Being one of the designated medics for our area CERT teams, my Medical/Trauma kits are immediately accessible (a smaller kit stays in my vehicle at all times). A slighly larger kit is in the hallway closet, open a door and grab it. This is the kit that doubles as a home First Aid kit. The full multi casualty kit stays in the Prep/Gun Secure room, ready for the call to assemble (along with body armor and everything I need for a CERT callup).
Except for food supplies (kept on a shelf to facilitate stock rotation) all other prepping gear is maintained in 6 MTM totes. The max weight of each, is less than 50 lbs, so that neither my wife or myself have any difficulty carrying them. Each is numbered and a laminated sheet attached to each catalogs the contents of each. I settled on 6, as it was the max number the roof rack on our SUV could handle in a single layer. This frees up the interior cargo space to allow for incidentals we may want to take with us should a bug out be necessary.
I should state, that we live in a town of around 100,000 (total county pop. is 130,000), not small but not huge either, on front range of the Rockies.
Due to our age and age related infirmities, Bugging In is the most logical choice as long as that remains viable. Bugging Out would be our last choice, and if a foot, would require a vast reduction in the amount of gear/supplies we could take with us.
Enjoying the site Daisy, and have picked up a number of ideas and alternatives. Kerp up the good work and Prep Away.
We moved from a condo to our dream place in the country. I had some things nicely organized. Then we moved back to the city.
Excellent suggestions:
Use color coordinated tape to help identify boxes or buckets.
I made up a seven day survival-type menu that we can just grab and go. It is all in round buckets, and labeled 1 of 3, 2 of 3, 3 of 3, and “get ten gallons of water.” Those buckets- in the house, along with our camping gear- in the garage (the extra, non-electric lighting lighting supplies are also in that area), all use the same color tape and are grouped together. In an emergency, we just need to go to two spots and load the car. Liter/gallon bottles of water are also ready to go and near the food.
Use the same size boxes and brand for easier stacking – plastic or paper. Get the heavy duty plastic containers. Yes it may cost a bit more in the beginning but they last much longer.
There are just two of us now, in a townhouse with a walk out level but with no basement or attic. I shopped until I could find a unit that had better storage. So, the lower level third bedroom is now a storage unit with those industrial kitchen metal shelves lining the walls, and buckets (of dried beans or fruit) underneath and in the center under a table. I started in one corner with dinners on the first shelf, followed by vegetables, fruits and juices/beverages, sweets, pickles and cooking supplies, meats, salad dressings, broths. There are six shelves in that room. Each shelf is organized in alphabetical order or group that makes the most sense for me. The logic flows from one corner of the room around the walls to the door.
I will respectfully disagree with the book/document boxes that are white hand have hand holds.
Those book boxes look great. But not if you have mice. They enjoy the easy entry through those handholds. It does not matter if you have the items in plastic bags, inside the boxes, because they will still chew through the plastic. Invest in plastic boxes for long term storage. We had to throw out a lot of books and other special items because they were not safe.